
4 posts tagged with "raspberry"

View All Tags

· 3 min read

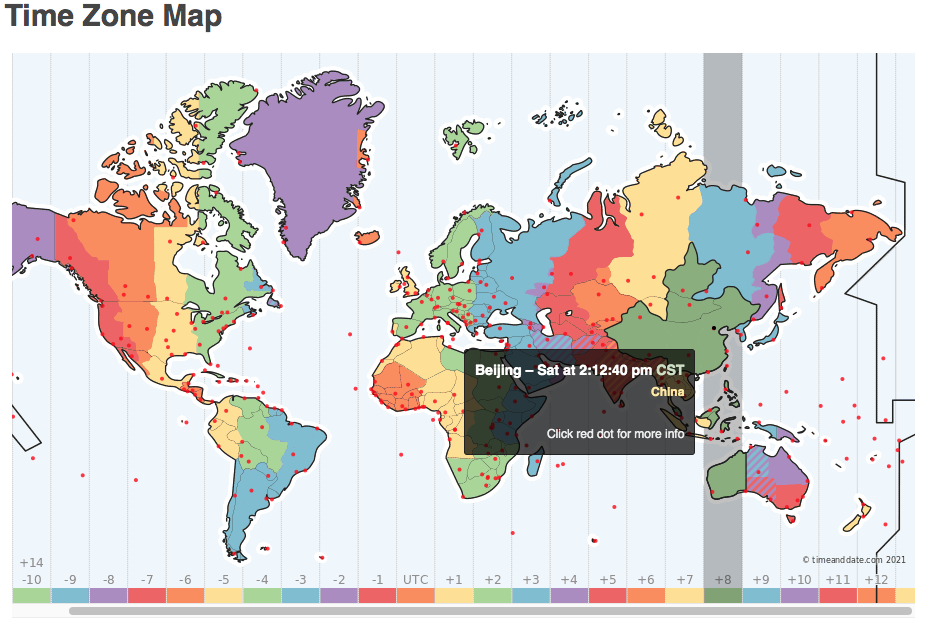
time zone map: https://www.timeanddate.com/time/map/

可以看到世界各地的时间是有差异的,不同时区时间不同

beijing处于东8区

默认树莓派的时区是美国的,如果你查看登陆等日志的时候会显得不习惯,这时你就需要修改下时区

查看本地的时区以及时间

可以使用命令date或date -R查看本地的时间
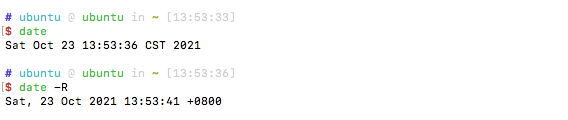
与本地的时间不符,需要对时区进行设置

有2种方法:

1. 通过tzselect进行设置,选择合适的时区即可。

$ tzselect
Please identify a location so that time zone rules can be set correctly.
Please select a continent, ocean, "coord", or "TZ".
1) Africa
2) Americas
3) Antarctica
4) Asia
5) Atlantic Ocean
6) Australia
7) Europe
8) Indian Ocean
9) Pacific Ocean
10) coord - I want to use geographical coordinates.
11) TZ - I want to specify the timezone using the Posix TZ format.
#? 4
Please select a country whose clocks agree with yours.
1) Afghanistan 18) Israel 35) Palestine
2) Armenia 19) Japan 36) Philippines
3) Azerbaijan 20) Jordan 37) Qatar
4) Bahrain 21) Kazakhstan 38) Russia
5) Bangladesh 22) Korea (North) 39) Saudi Arabia
6) Bhutan 23) Korea (South) 40) Singapore
7) Brunei 24) Kuwait 41) Sri Lanka
8) Cambodia 25) Kyrgyzstan 42) Syria
9) China 26) Laos 43) Taiwan
10) Cyprus 27) Lebanon 44) Tajikistan
11) East Timor 28) Macau 45) Thailand
12) Georgia 29) Malaysia 46) Turkmenistan
13) Hong Kong 30) Mongolia 47) United Arab Emirates
14) India 31) Myanmar (Burma) 48) Uzbekistan
15) Indonesia 32) Nepal 49) Vietnam
16) Iran 33) Oman 50) Yemen
17) Iraq 34) Pakistan
#? 9
Please select one of the following timezones.
1) Beijing Time
2) Xinjiang Time
#? 1

The following information has been given:

China
Beijing Time

Therefore TZ='Asia/Shanghai' will be used.
Selected time is now: Sat Oct 23 13:55:35 CST 2021.
Universal Time is now: Sat Oct 23 05:55:35 UTC 2021.
Is the above information OK?
1) Yes
2) No
#? 1

You can make this change permanent for yourself by appending the line
TZ='Asia/Shanghai'; export TZ
to the file '.profile' in your home directory; then log out and log in again.

Here is that TZ value again, this time on standard output so that you
can use the /usr/bin/tzselect command in shell scripts:
Asia/Shanghai

依此选择 4=>9=>1=>1 即可

最后一步很关键:要想是设置永久有效的话,你可以通过设置环境变量或者使用脚本的方法来实现,这里我选择了使用环境变量

export TZ='Asia/Shanghai'

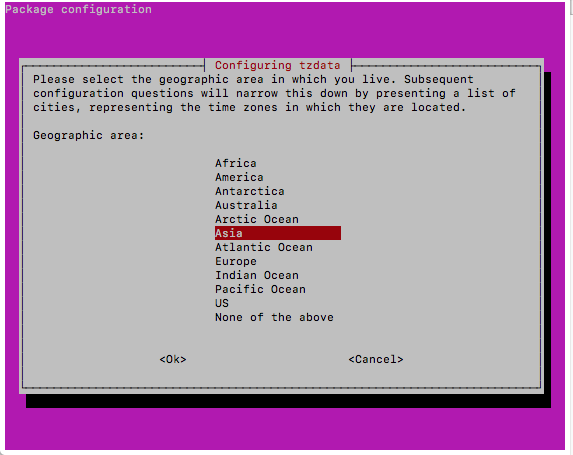
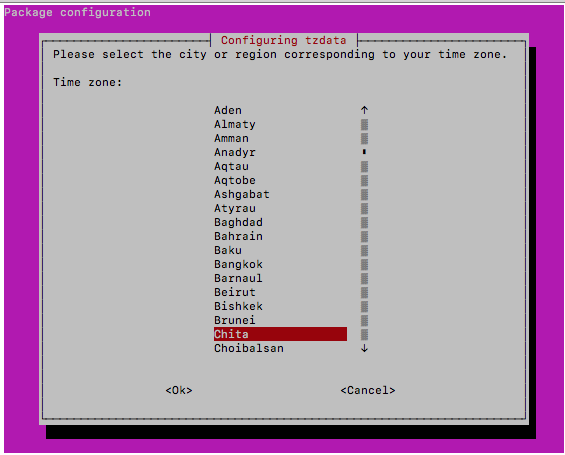
2,通过的命令dpkg-reconfigure tzdata打开图形界面设置时区,该命令需要root权限。

选择Asia

· One min read
git clone git@github.com:suzaku/shonenjump.git
cd shonenjump
go install

wget -O ~/.shonenjump.zsh https://raw.githubusercontent.com/suzaku/shonenjump/master/scripts/shonenjump.zsh
echo '. $HOME/.shonenjump.zsh' >> ~/.zshrc
source ~/.zshrc

# use
j sc
j des

· 2 min read
# install on ubuntu
sudo apt install mysql-server
# install on rasp-pi
sudo apt install mariadb-server-10.0
# 默认mariadb是没有密码的,sudo权限就可以进入
sudo mysql
# sudo mysql -u root -p
# Create New MariaDB User
CREATE USER 'user1'@localhost IDENTIFIED BY 'password1';
# Once you create user1, check its status by entering:
SELECT User FROM mysql.user;

Grant Privileges to MariaDB User

The newly created user does not have privileges to manage databases nor to access the MariaDB shell.

To grant all privileges to user1:

GRANT ALL PRIVILEGES ON *.* TO 'user1'@localhost IDENTIFIED BY 'password1';

The *.* in the statement refers to the database or table for which the user is given privileges. This specific command provides access to all databases located on the server. As this might be a major security issue, you should replace the symbol with the name of the database you are providing access to.

To grant privileges only for yourDB, type the following statement:

GRANT ALL PRIVILEGES ON 'yourDB'.* TO 'user1'@localhost;

It’s crucial to refresh the privileges once new ones have been awarded with the command:

FLUSH PRIVILEGES;

The user you have created now has full privileges and access to the specified database and tables.

Once you have completed this step, you can verify the new user1 has the right permissions by using the following statement:

SHOW GRANTS FOR 'user1'@localhost;

The information provided by the system is displayed on the terminal.

· 2 min read

夏日炎炎,是不是该给树莓派降降温了?

关于降温,在温控开关的加持下,我有2套方案:

  • 1, 风扇降温:优点操作简单;缺点噪音大,运转占比时间长
  • 2, 水冷降温:优点能狠狠地把温度压到某个范围(我用的是这个);缺点:需要自己动手组装,要点成本
温馨提示

如果你想给树莓派组装一套水冷系统,可以点击页面最底部的email私密我。

如果你通过pin脚来控制风扇的话,那么获取树莓派温度是个绕不开的问题

原理很简单,CPU会时时把温度写入/sys/class/thermal/thermal_zone0/temp这个文件中,我们要做的就是读取并解析

$ cat /sys/class/thermal/thermal_zone0/temp                    
41868

下面就是示例:

package main

import (
"fmt"
"io/ioutil"
"os"
"strconv"
"strings"
"time"
)

func main() {
for {
time.Sleep(time.Second)
fmt.Printf("%s: CPU 温度 %.2f\n", time.Now().Format("2006-01-02 15:03:04"), GetTemperatureFromPi())
}
}

func isExist(file string) bool {
_, err := os.Stat(file)
if err != nil {
return false
}
return true
}

//get temperature of raspberry pi
func GetTemperatureFromPi() float64 {
var result float64
var file = "/sys/class/thermal/thermal_zone0/temp"
if isExist(file) {
bs, err := ioutil.ReadFile(file)
if err != nil {
return 0
}
data := strings.TrimSpace(string(bs))
result, _ = strconv.ParseFloat(data, 64)
result, _ = strconv.ParseFloat(fmt.Sprintf("%.2f", result/1000), 64)
}
return result
}